Welcome to the exciting world of 3D AI generation! If you’ve been curious about creating 3D models from simple text prompts or images but felt intimidated, you’re in the right place. This guide is designed for absolute beginners and will walk you through creating your very first 3D model using Hunyuan3D in about 10 minutes.
We’ll cover everything from the easiest online tools to the more powerful local installations, ensuring you have a clear path to start your creative journey. By the end of this tutorial, you will have a downloadable 3D model and a solid understanding of the Hunyuan3D workflow.
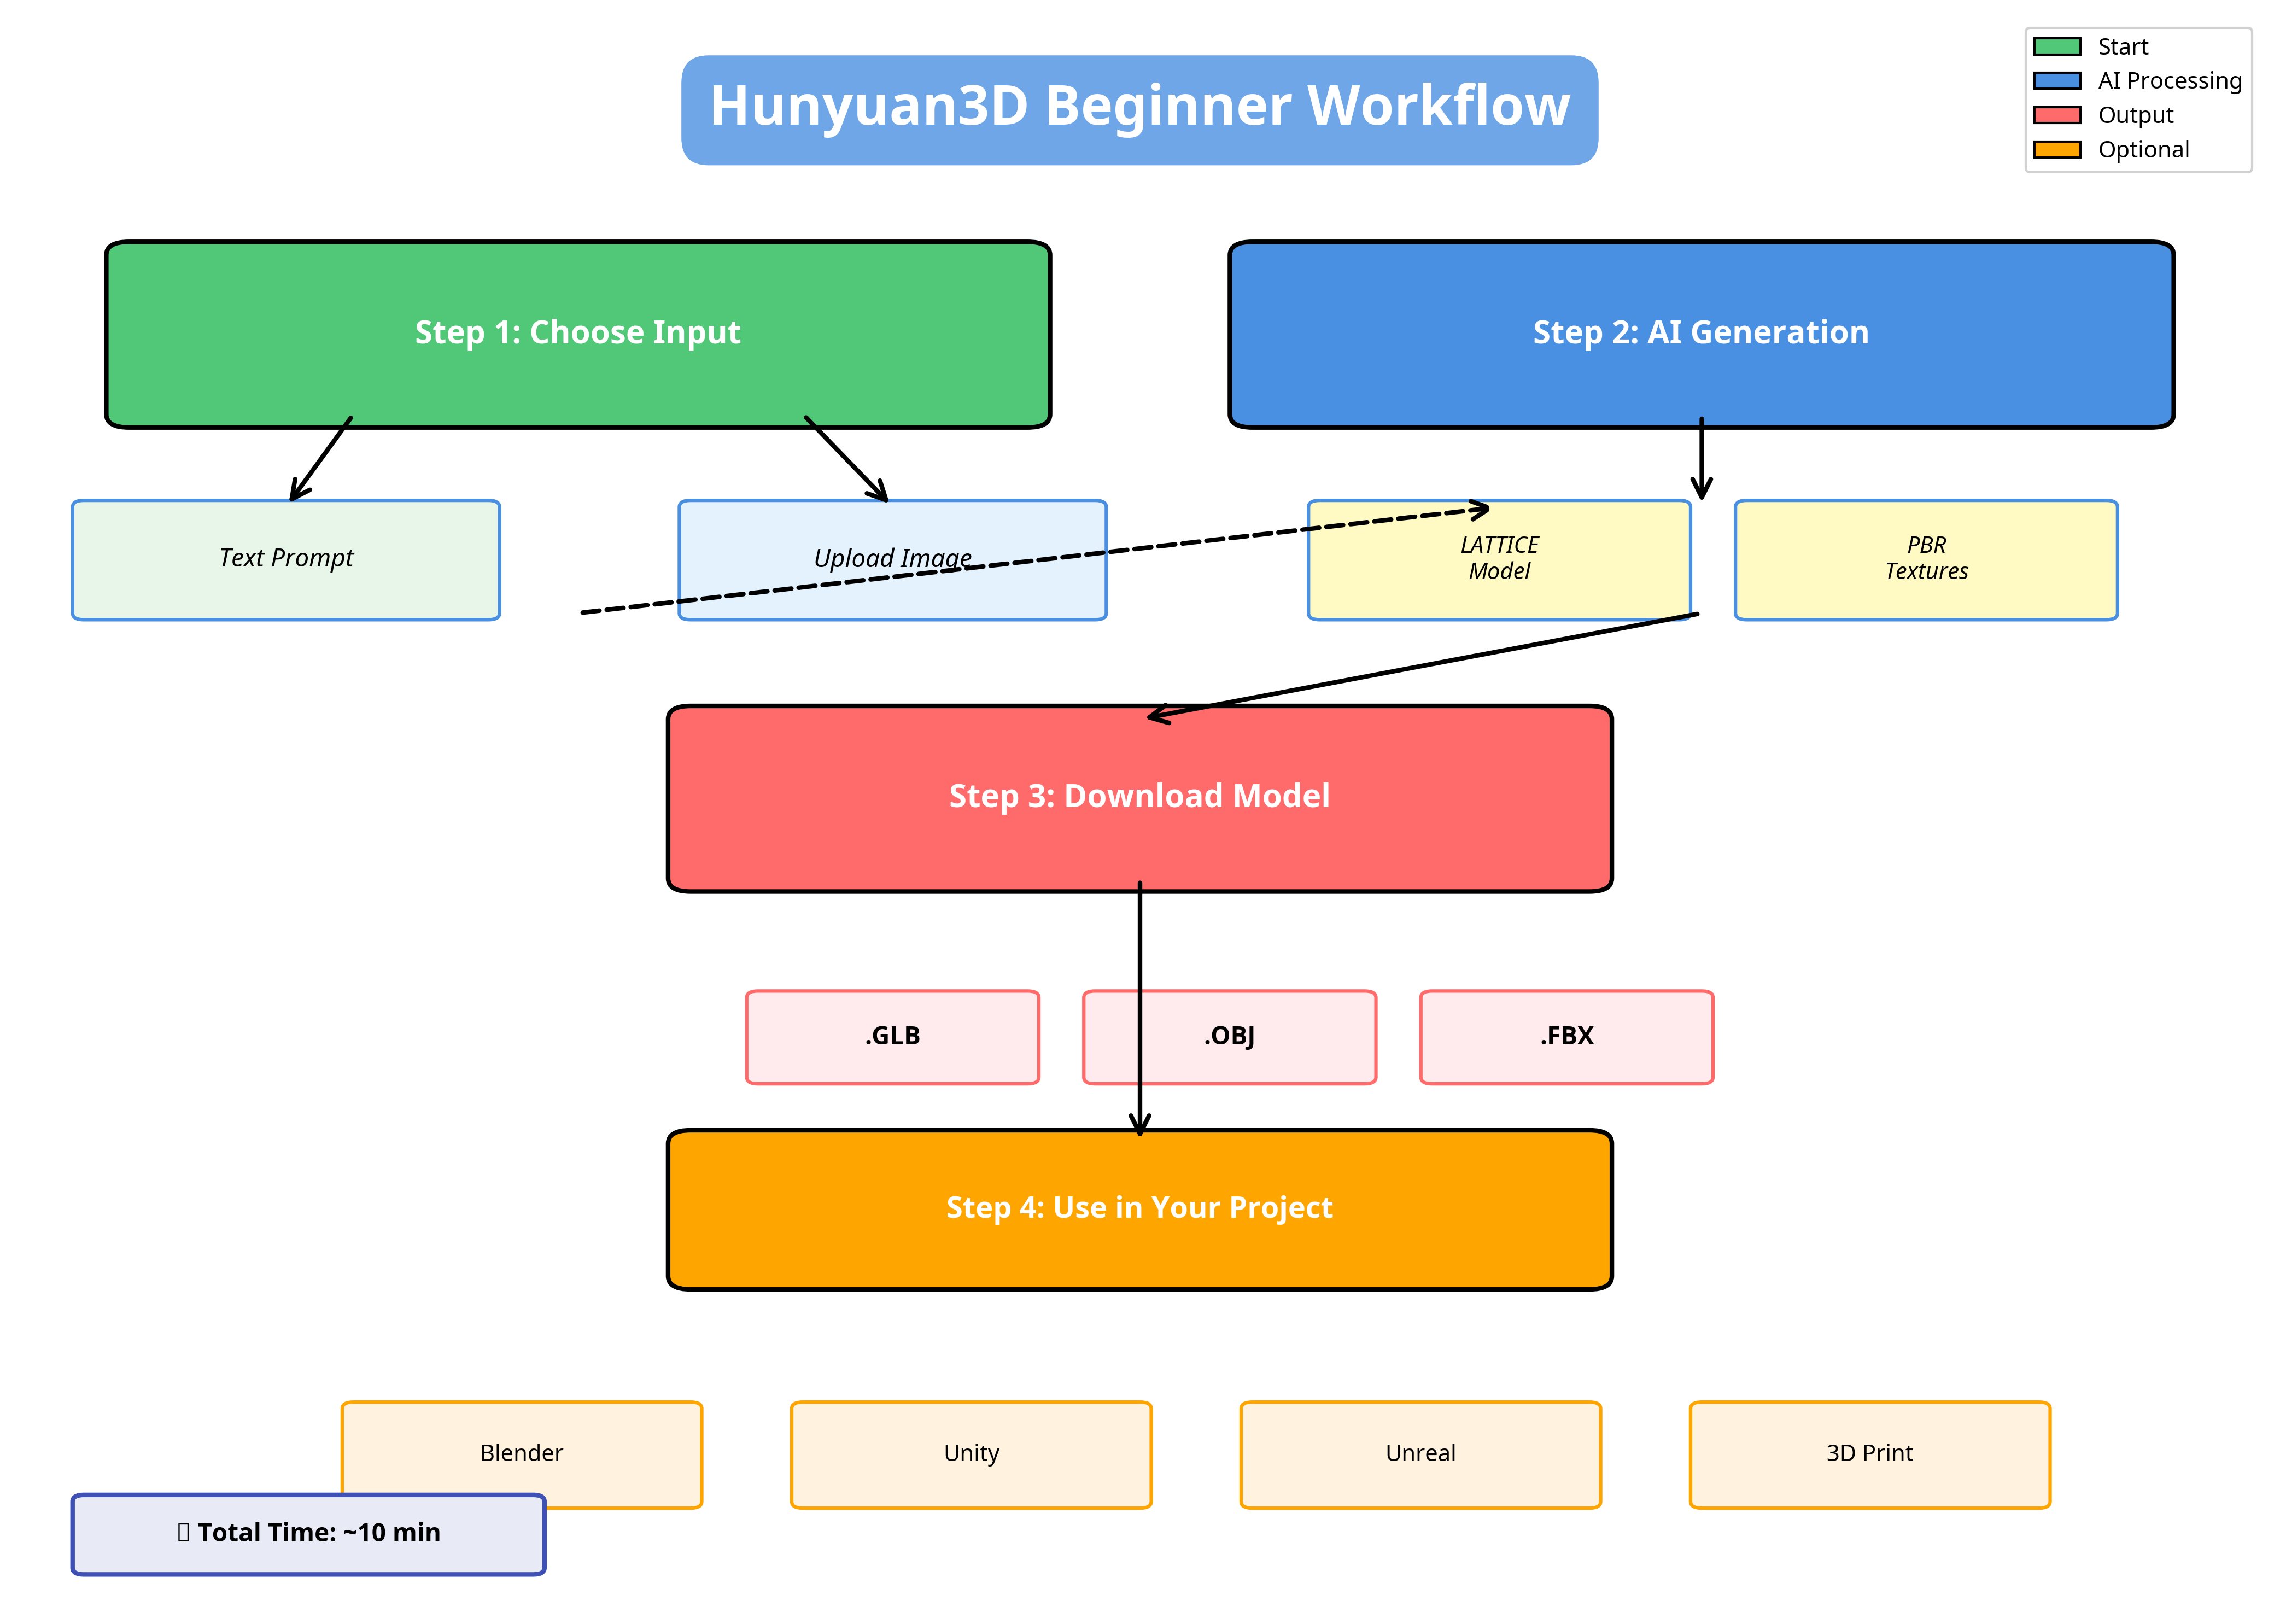 A visual overview of the simple, four-step process to create your first 3D model with Hunyuan3D.
What is Hunyuan3D and Why is it Special?
Hunyuan3D is a powerful, large-scale 3D synthesis system developed by Tencent. It allows you to generate high-resolution, textured 3D assets from either text descriptions or single images. What makes it stand out?
- High-Quality Output: It uses advanced models like LATTICE and generates realistic Physically-Based Rendering (PBR) materials, making the models look great right out of the box.
- Accessibility: With an official online demo, community-driven portable versions, and optimizations for consumer GPUs (8GB VRAM), it’s more accessible than ever.
- Open Source: The core models are open-source, fostering a vibrant community that constantly improves and builds upon the technology.
A Quick Note on Versions
As of early 2026, the AI landscape is moving fast! You might see references to “Hunyuan3D 3.0” or “HY 3D Pro” on platforms like Scenario or MakerWorld. These are often commercial or platform-specific integrations. For our purposes, we will focus on the latest official open-source version, Hunyuan3D 2.1, which is incredibly powerful and freely available.
Method 1: The 10-Minute Quick Start (Online Demo)
This is the fastest and easiest way to get started. You don’t need to install anything, just your web browser.
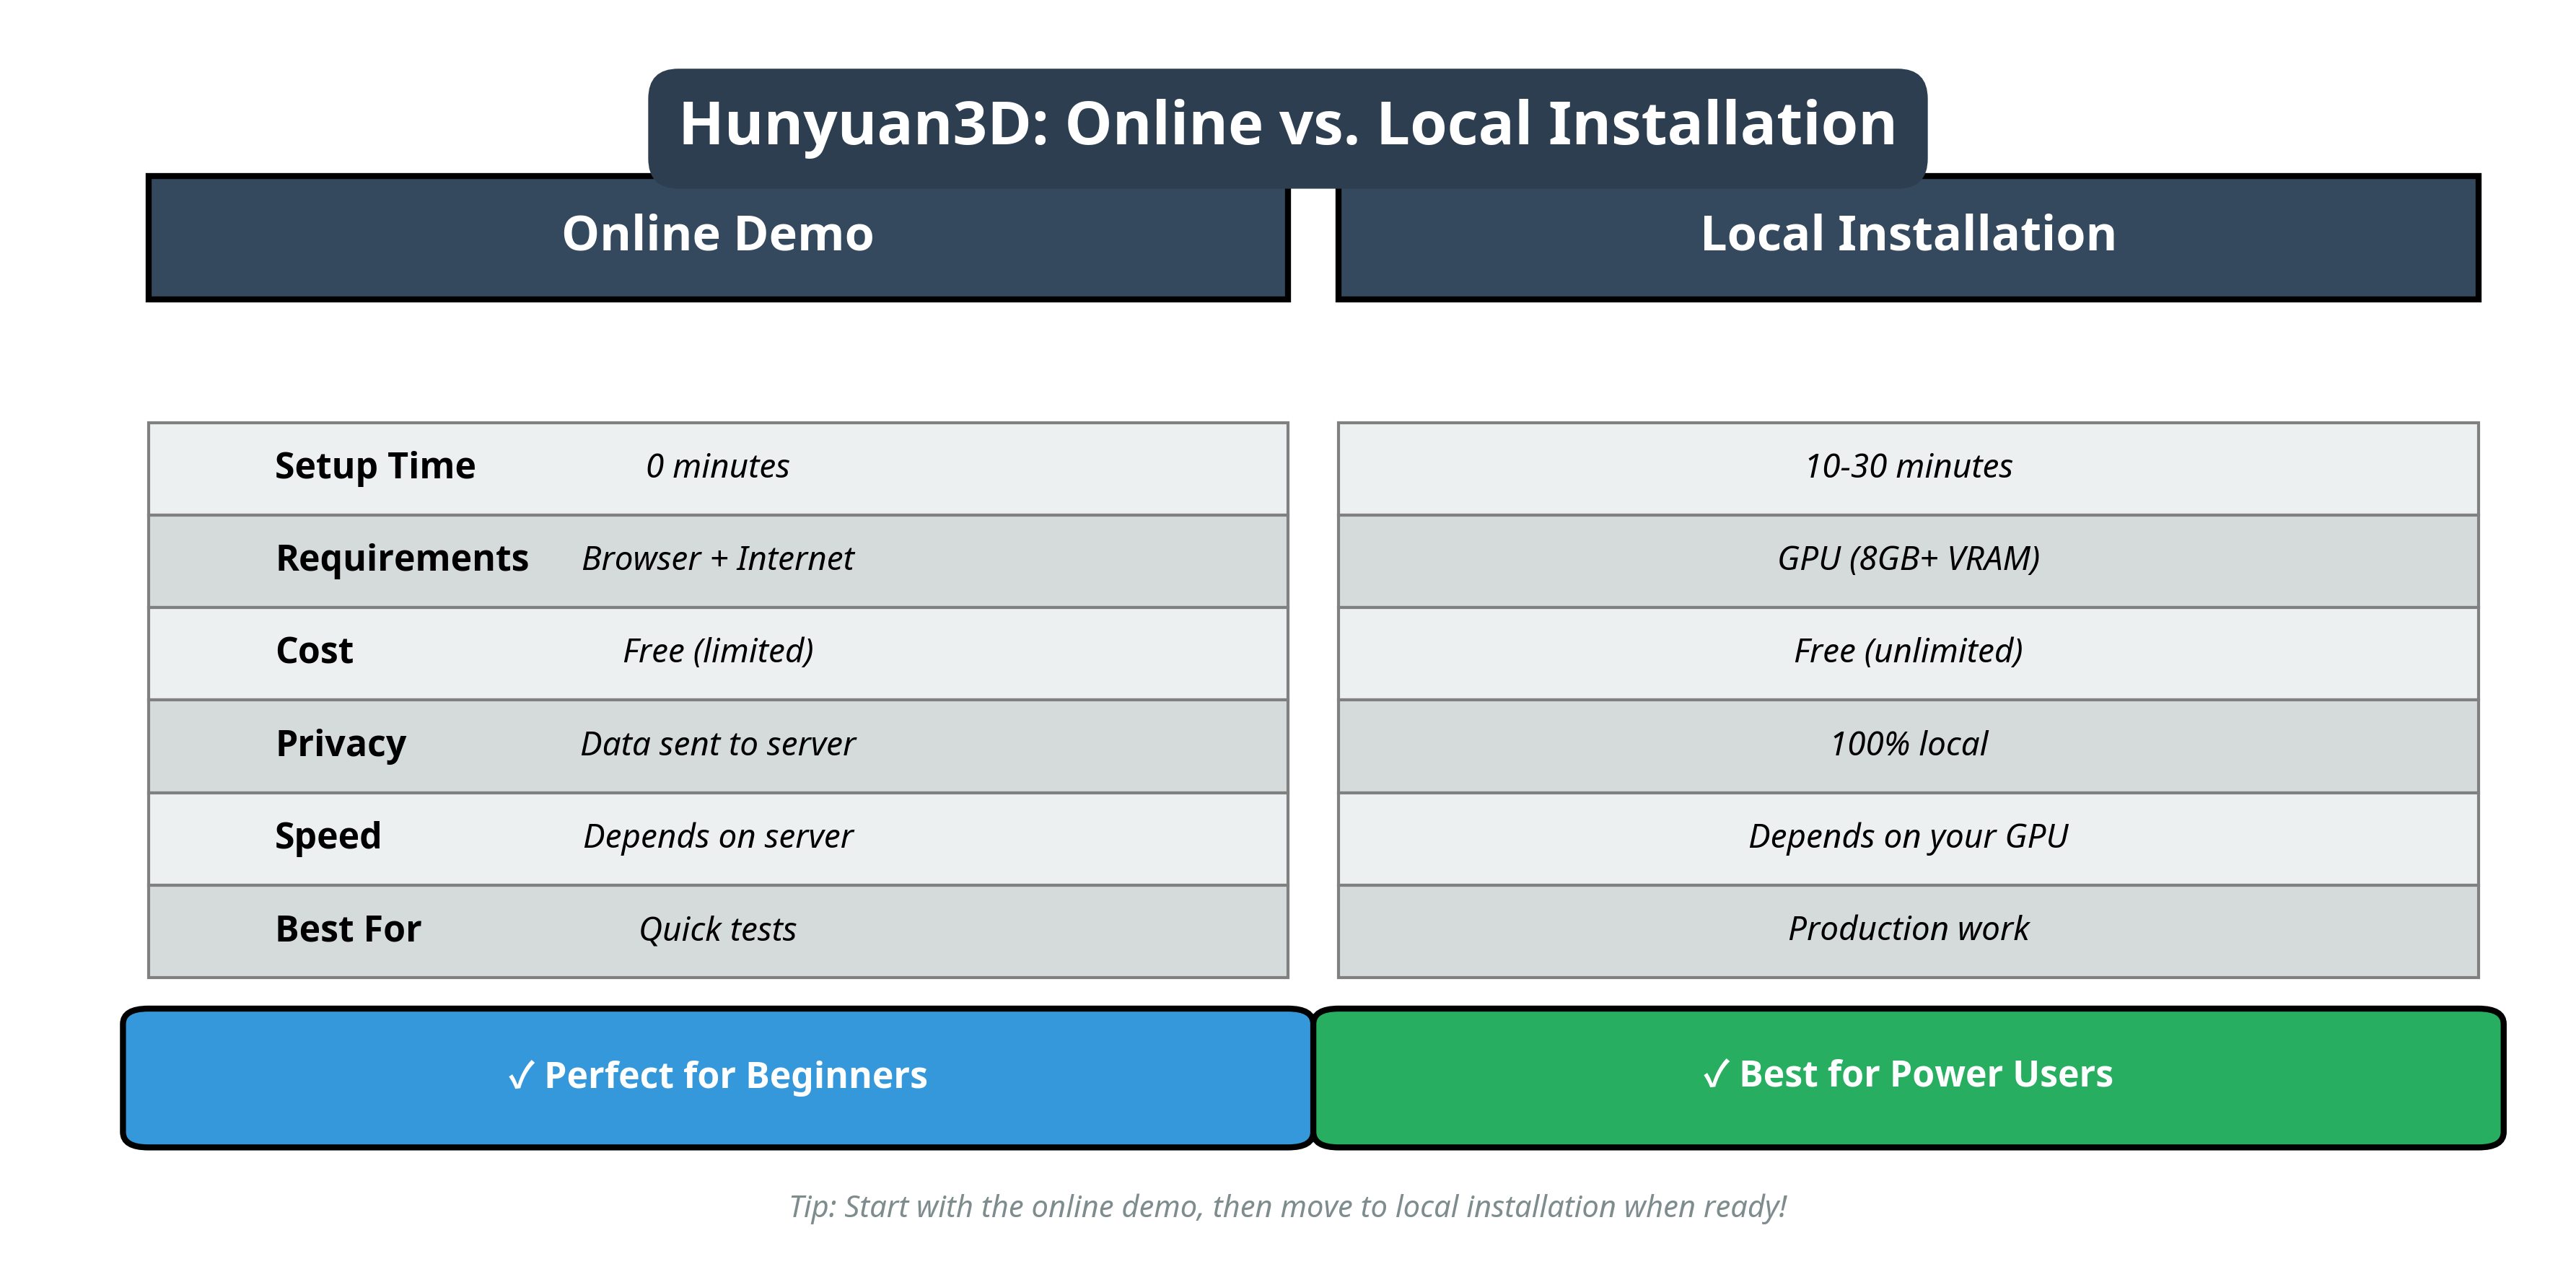 A comparison to help you decide which method is right for you. We recommend starting with the online demo.
Step 1: Access the Online Platform
Navigate to the official Hunyuan3D online demo: https://3d.hunyuan.tencent.com/.
Note: This platform requires a login with a Tencent account (like WeChat or QQ). If you don’t have one, you can try third-party platforms that have integrated Hunyuan3D, such as Scenario, but for the official experience, the main site is best.
Step 2: Choose Your Input
Once logged in, you’ll be presented with two main choices:
- Text-to-3D: Write a descriptive prompt. Be specific! Instead of “a sword,” try “a mythical elven sword with a glowing blue gem on the hilt.”
- Image-to-3D: Upload a single image. A clear image with a distinct subject works best (e.g., a photo of a product on a white background).
Step 3: Generate and Refine
Hit the “Generate” button and let the AI work its magic. This can take a few minutes depending on server load. The platform will generate a 3D model, and you can often refine it by generating new textures or variations.
Step 4: Download Your Model
Once you’re happy with the result, you can download your model. The most common formats are .GLB, .OBJ, and .FBX, which are compatible with almost all 3D software.
Congratulations! You’ve just created your first AI-generated 3D model.
*A great video guide showing the online generation process from start to finish.*Method 2: Local Installation for More Power
Ready to take off the training wheels? Running Hunyuan3D locally gives you unlimited generations, more control, and better privacy. Thanks to community optimizations, this is now possible even on GPUs with 8GB of VRAM.
Step 1: Check Your Requirements
- GPU: NVIDIA GPU with at least 8GB VRAM.
- OS: Windows or Linux.
- Software: Python 3.11 and CUDA 12.4 are recommended for best results.
Step 2: Installation
For Windows users, the easiest way is to use the community-made WinPortable version. It’s a one-click installer that includes everything you need.
*This video explains the benefits of the WinPortable local installation.*For manual installation, you’ll need to clone the official GitHub repository and install the dependencies. Be mindful of PyTorch and CUDA versions, as mismatches are a common source of errors.
# Clone the official repository
git clone https://github.com/Tencent-Hunyuan/Hunyuan3D-2.1.git
cd Hunyuan3D-2.1

# Install dependencies (ensure you have the correct Python/CUDA versions)
pip install -r requirements.txt
Step 3: Run the Local Web UI
Once installed, you can launch a local web interface (often using Gradio) that provides a similar experience to the online demo, but runs entirely on your machine.
python app.py
Now you can generate models freely without limits!
What’s Next?
You’ve created a model, what now? The possibilities are endless:
- 3D Printing: Prepare your model for 3D printing.
- Game Development: Import it into Unity or Unreal Engine as a game asset.
- Animation: Bring it into Blender to rig and animate it.
- Anime Characters: Use our AI Anime 3D Generator to instantly convert 2D art into 3D.
- Quick Image Conversion: Turn any PNG artwork into a 3D model with our Free PNG to 3D Converter.
- VRChat Avatars: Create your own custom VRChat Avatar from a text description or drawing.
- Further Learning: Explore advanced features like the API for batch generation or the new HY-Motion model for character animation.
This is just the beginning of your journey with 3D AI. Experiment with different prompts, explore advanced workflows, and most importantly, have fun creating!